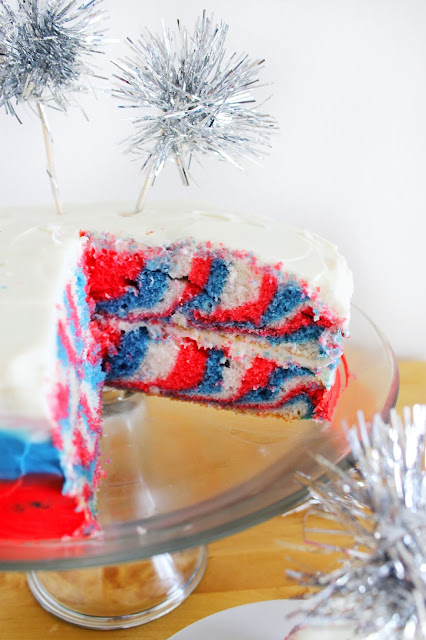
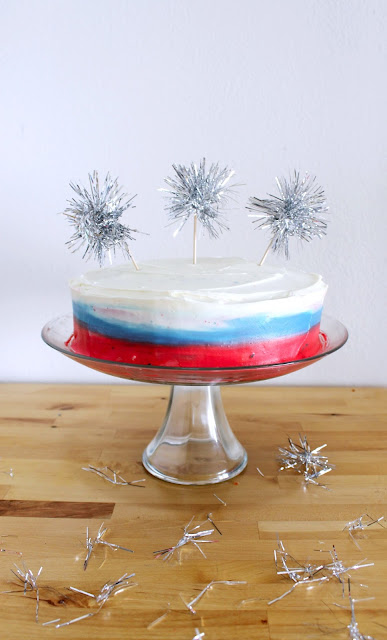
BAH! Thanks for all the love from Pinterest you guys! Follow along for more colorful ideas HERE!
xo, lp
---------------
Today's recipe ROCKS. I'm not gonna lie, it takes a little bit of time to make - but it's super easy, and the reaction you'll get from your friends or family is worth EVERY minute of time you put in!
If you've been following this blog long enough, you know I LOVE a good ol' holiday.
Making some baked treats or cocktails with a theme is right up my alley, I don't care how lame that is!
In years past for the 4th of July I've focused on cocktails (like these mixed berry mojitos)...but this year I decided a cool cake would be just the ticket.
4th of July is just a couple weeks away, so be sure to pin this idea now to Pinterest or share the link to this post on Facebook (I'll love ya extra if you do!).
So you want to know how to make it happen? Here ya go:
So you want to know how to make it happen? Here ya go:
What you'll need to make it happen:
- Red & Blue food coloring
- 2 containers of white frosting (you could totally make homemade buttercream, I just didn't!)
- White cake mix (or make your own, like I did using Martha's recipe)
- A whole bunch of bowls!
- Two 8" round cake pans
How to make it happen (full picture instruction at the bottom of the post):
Step 1: Preheat your oven and grease your cake pans well.
Step 2: Mix up your cake batter and separate evenly into 3 bowls, coloring 1 blue, 1 red, and leaving 1 white.
Step 3: Using either a melon baller, large spoon, or 1/4 cup measuring cup (no shame in any of those!) pour in about 1/4 cup of white cake batter in the center of the pan.
Step 4: Repeat the same step with your blue batter,pouring directly in the center of your white batter.
Step 5: Yup, you guessed it, repeat this exact same thing with the red batter! Keep doing this for each of the cake pans until you're out of batter and your pans look like 3 color bullseyes.
Step 6: Bake your cake per the direction in the recipe or on the box and let cool completely.
Step 7: If needed, cut the rounded edge of the top of the cake off so they stack well. Apply a thick layer of frosting on the first layer and add the top layer.
Step 8: Apply a "crumb coat" - frost the entire cake with white frosting to seal in all those pesky crumbs.
Step 9: Split your second can of frosting into 3 bowls and dye 1 red, 1 blue. Rough frost red at the bottom of the cake, blue in the middle, and white at the top edge and full top of the cake.
Step 10: Using a flat spatula, smooth and slightly blend the frosting out on the side until the cake is fully smooth.
Step 11: Top with some decorations, cut, and enjoy!!
Can we talk about the WOW factor when you cut into this cake?
What 4th of July food or drinks will you be making?
Bonus points if you'll be making this!
xo, lp
Looking for a no-bake 4th of July dessert idea? Try this awesome marbleized bark HERE!
psssst: for more colorful stuff, go here
If you're more of a picture person, here's the full tutorial in one image! Pin away or share to your hearts content, m'love!


This is so freakin' cool! I can't imagine mine would come out nearly as good, but I'd love to try this!
ReplyDeleteThank you!! And nonsense- I'm sure yours would be great!
DeleteI made this cake on July 4th and it was SO FUN to watch everyone react as the cake was sliced. I served it with fresh blueberries and strawberries on the side :) My only difficulty was in getting the color of icing dark enough, particularly the red. I think next time I'll have more/better food coloring on hand!
ReplyDeleteTHANK YOU for posting this, I cannot wait to make more tie-dye cakes!!
I'm so glad that you got that awesome result!!
DeleteI used GEL food coloring instead of the usual liquid/tear drop shaped ones - so hopefully that helps get your red darker next time!
Thanks for trying the recipe! :):)
Thanks for the tip - I will try gel next time!
Deletechenlina20160416
ReplyDeletejordan 11 concord
ray ban sunglasses outlet
adidas originals
burberry outlet
burberry scarf
toms shoes outlet online
ralph lauren outlet
instyler max
louis vuitton outlet
louis vuitton outlet stores
tory burch outlet
michael kors handbags
timberland outlet
coach factorty outlet online
nike air huarache
nike air max
kate spade handbags
air huarache
christian louboutin outlet
timberland outlet
adidas superstar
michael kors
gucci outlet
michael kors
michael kors outlet
nike roshe runs
canada goose jackets
kobe bryant shoes
tiffany outlet
kd 8 shoes
oakley vault
nike air max 90
ed hardy clothing
north face outlet
ugg outlet
louis vuitton outlet
louis vuitton outlet
tory burch handbags
coach outlet
air jordans
as
Would this technique work if done in cupcake form? Seems like it would, but curious if you've ever tried....
ReplyDeleteHi Nicole- My blog has had multiple glitches and I just got a backlog of comments from 2016- Not sure if you'll see this- but if so: this does SORT of work for cupcakes- the last few pours of batter you put in kind of fold in on themselves- but still gives a cool marbleized look!!
DeleteI must be a dullard.. So I put 1/4th of batter in cake pan, top it with red & blue, but the pan doesn't have very much batter in it. So I am confused how you have so many layers of color in each cake. Do you keep putting more "dollops" in each pan? I don't get it. I tried but I don't get it lol
ReplyDeleteHi!I think maybe where you ran into trouble was by putting 1/4 of the batter in the pan first!
DeleteI would suggest using a large spoon or a 1/4 cup measuring cup to put in the dollops. put a small dollop of white in each pan, then red, then blue, and so on. The step by step images might help!
I used 2 regular circle cake pans- so once the batter is fully done, you should have a 2 layer cake out of a standard box cake mix!
hope that helps!
So put the dollops in, layering the colors And keep adding & alternating colors? I stopped at one dollop of each color... I need to continue adding until there's sufficient batter for the pan. LOL appreciate it!
DeleteI read that Post and got it fine and informative.
ReplyDeleteweight training supplements
Phenomenal Blog! I should thank for the endeavors you've made in composing this post. I'm trusting exactly the same best work from you down the road too.New York
ReplyDeleteThis article is interesting and useful. Thank you for sharing. And let me share an article about health that God willing will be very useful. Thank you :)
ReplyDeleteObat Luka Berair yang Tak Kunjung Sembuh
Pengobatan Miom tanpa Operasi
Obat Penghancur Benjolan di Leher
Cara Mengobati Sakit Dada secara Alami
Cara Mengobati sakit Telinga Secara Alami
Obat Herbal Penghancur Miom
This looks so fun! I'm going to give it a try next week! Thank you!
ReplyDeleteشركة نقل عفش بحائل
ReplyDeleteشركة تنظيف بالرياض مجربه
شركة رش مبيدات بحائل
شركة تنظيف بحائل
شركة تنظيف مجالس بحائل
شركة نقل اثاث بحائل
Jaipur to Barmer taxi
ReplyDeleteuidfgh34tdsfdsf
ReplyDeletegolden goose outlet
golden goose outlet
golden goose outlet
golden goose outlet
golden goose outlet
golden goose outlet
golden goose outlet
golden goose outlet
golden goose outlet
golden goose outlet