Showing posts with label 4th of July. Show all posts

Wednesday, June 29, 2016

4TH OF JULY CANDY BARK

I had to get in one post before the weekend of 4th of July celebrating! 
Be sure to follow the ridiculousness on Instagram --> @lpodlich  or on Snapchat: lpod216

Get ready to make this and have everyone think you are SUPER cool (pin it so ya don't forget it):
4th of July Bark! Looks so cool- have to make this!

Candy Bark of all forms is every where. I mean, I make peppermint bark every year and thought THAT was fancy, but now people are making a million iterations (how cool is this Pocky bark?!). I see Halloween Bark and Christmas Bark and ALL THE BARK in my future. Slash YOUR future.
But today, we're just going to start with 4th of July bark. It's fun. It's festive. It's easy as heck.

-----4th of July Dessert

What you need to make it happen:
1 cup White chips
1 cup Wilton Blue Candy Melts (get them at Michael's, Joanns, Amazon)
1 cup Wilton Red Candy Melts 
Pan lined with Parchment Paper
Something to swirl with (I used a wooden kabob skewer)
Red/White/Blue M&Ms, sprinkles, or other candy
Crisco (optional)
Parchment lined baking sheet

How to make it happen:
Step 1: Separate your candy melts into 3 bowls and melt on medium-high heat in the microwave for 25 seconds at a time, until melted. If you choose to use Crisco to make melts thinner, use 1/2 Tbsp per color.
Step 2: Plop down (official term) your melted candy color by color, so they are all over the pan, touching but not overlapping. (Pro Tip: If you are using white chips instead of white candy melts, do the white last. It kind of got overpowered by the other colors!)

Step 3: Using a skewer (or another pointed object) start to slowly swirl your colors together, with long sweeping swirls. If you over-swirl (another official term) you'll end up with a pan of purple.

Step 4: While the candy is still melted, scatter M&Ms and sprinkles over it, and put in the refrigerator to cool/harden.

Step 5: Once fully hard, break into pieces and enjoy!
4th of July Dessert
4th of July Dessert

Pro Swirlz:
4th of July Dessert

4th of July Dessert

4th of July Dessert

So easy!
What (besides this) will you be making this 4th?
xo, lp


Still need more 4th Of July ideas? Try the coolest Tie Dye Cake or these Mixed Berry Mojitos!

Also, be sure to follow me on Instagram --> @lpodlich  or on Snapchat: lpod216

4th of July Bark! Looks so cool- have to make this!


Thursday, June 25, 2015

EASY 4TH OF JULY DIY: 5 MINUTE CAKE TOPPERS

Last week on the blog I posted one of the coolest baked goods I've made in a while- a Tie-Dye 4th of July Cake. I topped it with some homemade "sparklers" which were just made of toothpicks, christmas tree garland, and double sided tape!

I came up with a few other cake topper ideas for the 4th- all of which took about 5 minutes total to make- so no excuses about not having any time to add that extra touch to your 4th of July dessert! These could easily be added to cupcakes or brownies as well :)

So here's the cake (recipe here):
4th of july tie-dye cake

And here are the cool 4th of July cake topper ideas:
4th of July Cake Topper DIYS

THE SPARKLERS:
What you need:
Silver or gold christmas tree garland // double sided tape // toothpicks
How to do it:
Cut 2-3" long pieces of garland and wrap it around a toothpick that has double sided tape on the end. Pinch until adhered, and add to cake!

THE WATERCOLORS:
What you need:
Cardstock paper // toothpicks // tape // sharpie marker
How to do it:
Watercolor red and blue stripes with some white in the middle on your cardstock. Let dry. Write a 4th of July message on it, and adhere to toothpicks!

THE STARS + SPARKLERS:
What you need:
Silver or gold christmas tree garland // double sided tape // toothpicks // colored paper
How to do it:
Take steps from "The Sparklers" to make the first part. Cut out stars on colored/pattern paper and tape to tooth picks. Mix & match on the cake!

THE WASHI TAPE FLAGS:
What you need:
Toothpicks/ Red/Blue Washi Tape/ String/Twine
How to do it:
Cut pieces of washi tape and fold in half over string/twine. Cut into flag shapes, alternating red and blue. Tie or tape string to two toothpicks, and set apart on cake.


Easy, right?
What will YOU be making for the 4th of July?

xo, lp

Wednesday, June 17, 2015

4TH OF JULY TIE-DYE CAKE


BAH! Thanks for all the love from Pinterest you guys! Follow along for more colorful ideas HERE!
xo, lp


---------------
Today's recipe ROCKS. I'm not gonna lie, it takes a little bit of time to make - but it's super easy, and the reaction you'll get from your friends or family is worth EVERY minute of time you put in!


If you've been following this blog long enough, you know I LOVE a good ol' holiday.
Making some baked treats or cocktails with a theme is right up my alley, I don't care how lame that is!
In years past for the 4th of July I've focused on cocktails (like these mixed berry mojitos)...but this year I decided a cool cake would be just the ticket.

4th of July is just a couple weeks away, so be sure to pin this idea now to Pinterest or share the link to this post on Facebook (I'll love ya extra if you do!).

So you want to know how to make it happen? Here ya go:
the COOLEST 4th of July Tie-Dye cake! must make this year!

What you'll need to make it happen:
- Red & Blue food coloring
- 2 containers of white frosting (you could totally make homemade buttercream, I just didn't!)
- White cake mix (or make your own, like I did using Martha's recipe)
- A whole bunch of bowls!
- Two 8" round cake pans

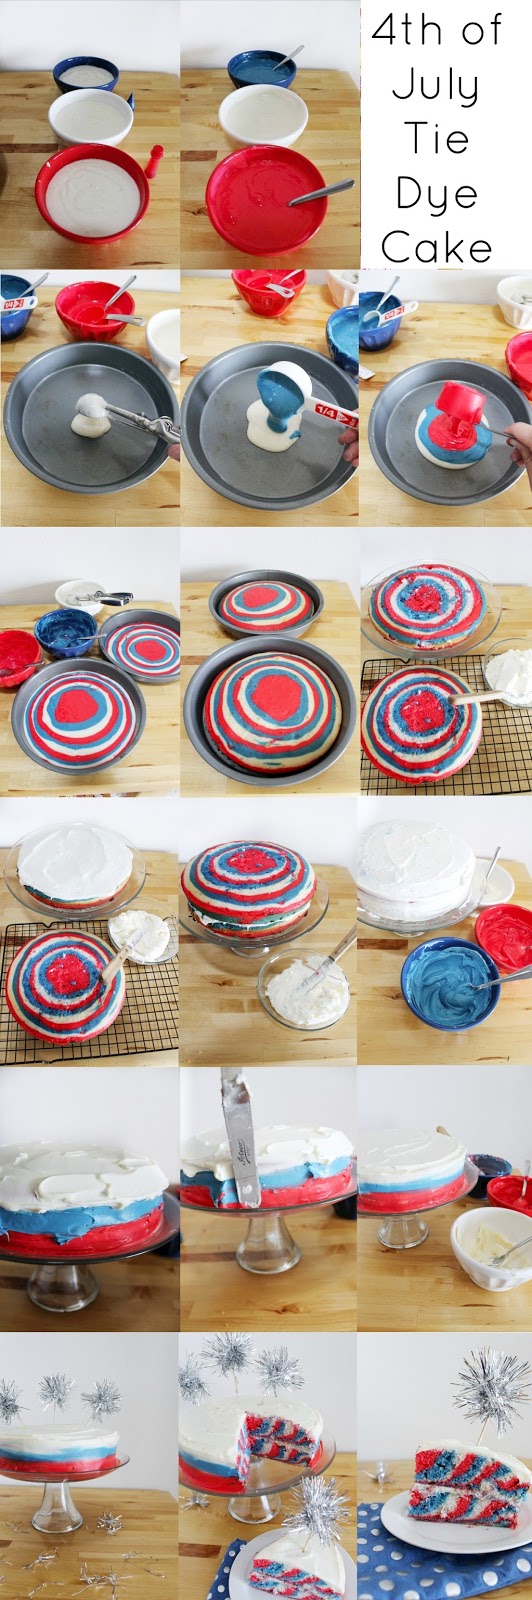
How to make it happen (full picture instruction at the bottom of the post):
Step 1: Preheat your oven and grease your cake pans well.
Step 2: Mix up your cake batter and separate evenly into 3 bowls, coloring 1 blue, 1 red, and leaving 1 white.
Step 3: Using either a melon baller, large spoon, or 1/4 cup measuring cup (no shame in any of those!) pour in about 1/4 cup of white cake batter in the center of the pan.
Step 4: Repeat the same step with your blue batter,pouring directly in the center of your white batter.
Step 5: Yup, you guessed it, repeat this exact same thing with the red batter! Keep doing this for each of the cake pans until you're out of batter and your pans look like 3 color bullseyes.
how to make a 4th of July Tie Dye Cake!
Step 6: Bake your cake per the direction in the recipe or on the box and let cool completely.
Step 7: If needed, cut the rounded edge of the top of the cake off so they stack well. Apply a thick layer of frosting on the first layer and add the top layer.
Step 8: Apply a "crumb coat" - frost the entire cake with white frosting to seal in all those pesky crumbs.
Step 9: Split your second can of frosting  into 3 bowls and dye 1 red, 1 blue. Rough frost red at the bottom of the cake, blue in the middle, and white at the top edge and full top of the cake.
Step 10: Using a flat spatula, smooth and slightly blend the frosting out on the side until the cake is fully smooth.
Step 11: Top with some decorations, cut, and enjoy!!
beautiful 4th of july cake

Can we talk about the WOW factor when you cut into this cake? 
the COOLEST 4th of July Tie-Dye cake! must make this year!

the COOLEST 4th of July Tie-Dye cake! must make this year!

What 4th of July food or drinks will you be making?
Bonus points if you'll be making this!
xo, lp

Looking for a no-bake 4th of July dessert idea? Try this awesome marbleized bark HERE

psssst: for more colorful stuff, go here


If you're more of a picture person, here's the full tutorial in one image! Pin away or share to your hearts content, m'love!
How To: 4th of July Tie Dye Cake- super easy tutorial that works!

Monday, July 8, 2013

USA JELLO. AND CHEESEBOARDS. AND DRINKS.

Oh long weekends, you are too good! 

 I hope you all had a fun 4th of July! The weather has been 100% perfect lately, which has made the last week and weekend ridiculously enjoyable.

Wednesday we met up with friends for Concert on the Square- which features the Wisconsin Chamber Orchestra right on the Capitol lawn. Other than a few tiny rain drops it was completely comfortable:

Sorry for the boatload of 4th of July photos on Instagram! We had a blast at our friend's house, with a marathon day of yard games, drinking, and eating. SO Amurrrrican.
This was the excuse to bust out every USA themed thing I own...including this USA cheeseboard:

....and my USA jello mold! I used 3 flavors of jello (&vodka) to make a triple layer jello shot. It was huge! We all took turns cutting out states and eating them. Because we're cool like that.

Oh, and the main event for the day? COLORSBEE! A new and improved version of Beersbee, it involved getting really messy with dyed drinks and kiddie pools full of dyed water. Dani even made shirts for us!

We didn't make any other specific plans for the weekend because we knew we'd be packing up our apartment for the upcoming move! We spent time by the pool, played darts with friends, and had a great date night on the Cap Square. If you're in Madison, you've got to try DLUX. I was skeptical-but our meal was excellent. I rarely get cocktails- but the Blvd Buzz with bourbon, blackberries, and turbinado sugar was too good to pass up! 
 (also- you can barely see it, but i'm wearing my new favorite shirt with zebras on it! it looks ridiculous how it's styled online, but i sized up so it's not a freaking belly shirt. highly recommend!)

So that was our weekend. How was yours, friends?
Anyone else eat something in the shape of the USA?
gosh I sure hope so...


xo, lp


*find me on instagram here


*Psst: if you're an online shopper, you HAVE to use Ebates. Fer real, y'all. Find out more HERE*

Tuesday, July 2, 2013

SIX FANTASTIC FOURTH CUPCAKES (easy designs that take minutes!)

Let's talk straight for a sec:
I love baking from scratch and all, but sometimes it's a pain in the ass. When you just want something last second it can be a bummer when you don't have all the ingredients at hand. So, at times like this, I bake from a box. AH! GASP! BLASPHEMY! The girl that bakes uses box mixes sometimes?!? 

I know, your vision of my is shattered. Sorry. To help you cope, go eat a box of cupcakes. 

These are 6 super fast, fun 4th of July cupcake decorating ideas. All you need is a box of cupcake mix, some frosting, and the topping of your choice. Have fun!

Don't they look great together? Some fun, some whimsical, some classy. Make a bunch of each to please any crowd!

 Cupcake #1: Swirly Cupcake
This one is super easy, take some white frosting and dye some blue and some red. Swirl plain white along with the two colored frostings and BAM. Pretty swirls.

Cupcake #2: Washi Flag Cupcakes
All you need for this one is a few toothpicks and some washi tape. Just fold over, cut into triangles and you're good to go!

Cupcake #3 The Easiest Candy Cupcake
There are plenty of red & blue candies out there to fulfill this cupcake task. My current favorite is the 4th of July Twizzlers that you can buy at Walgreens. Lemonade/BlueRaspberry flavored. Nom.

Cupcake #4: Layered Swirl Cupcake
This one is the only cupcake that requires a little effort. Open a ziplock and hold it up by one corner. Drip red food coloring down one edge of the bag, and blue down the other- so they come together to a point. Cut the tip off the bag to let excess run out, and then load with white frosting. Squeeze to create ad swirled look!

Cupcake #5: Fruity 4th Cupcake
Just slice up some strawberries (or raspberries or cherries) and add some blueberries. Done!

Cupcake #6: Sprinkle Cupcake
If you don't have blue and red sprinkles, either use M&Ms or color white sugar with food coloring! 

Perfect!

Which one of these decorations would you try?
Let me know!

xo, lp


Looking for more 4th of July fun? Try my Patriotic Frozen Punch or 4 Washi Tape decorations for the 4th.

Friday, June 28, 2013

4 RED WHITE & BLUE WASHI IDEAS!

I'm slowly but surely starting a washi collection...so I decided to put some of the red & blue to good use!

Yesterday The Washi Blog featured my 4th of July washi straws- and I figured I should share a few more super easy red/white/blue crafts :)
--------------

The 4 super easy crafts are as follows:
1. Patriotic Planner
2. 4th of July straws
3. Cupcake party flags
4. USA cups

#1: Patriotic Planner:
I am a planner hoarder, and the one I got from Target a little while back had its gold stripes wearing off. I figured and little makeover was in order with a few strips of red and blue washi:

#2: 4th of July straws:
Paper straws are cute enough already, but adding these little flags makes them even better! Just fold over, cut out a triangle, and you're good to go.

#3: Cupcake Party Flags:
These are the easiest ever. I mean, just little triangles on toothpicks? Definitely going to be making these for every holiday there is!

#4: USA Party Cups:
The possibilities are endless here, but I went with a simple USA flag and some fun fireworks! If you're having a small get together, making a different design for each guest could be a great way to differentiate whose glass is whose!

If you're looking for more fun washi ideas, you have to check out The Washi Blog!

Have any fun 4th of July decorating tips?
Feel free to share my friends!

xo, lp 
Related Posts Plugin for WordPress, Blogger...