Showing posts with label Holiday Food and Decor. Show all posts

Wednesday, December 4, 2013

DIY HOLIDAY: GOLD JEWELRY DISHES

Here's the deal:
Everyone has those friends that you're not quite sure what to buy for them- because they have a great job and buy everything they need.
Most people also has those office Secret Santas that you're not quite sure what to buy for them- because they don't really share their likes other than post-it note color preference.

So, insert this DIY Holiday gift. 
Cost: Under $2. Insanely easy. Personalizeable. 
I give you: DIY Gold Jewelry Dishes!
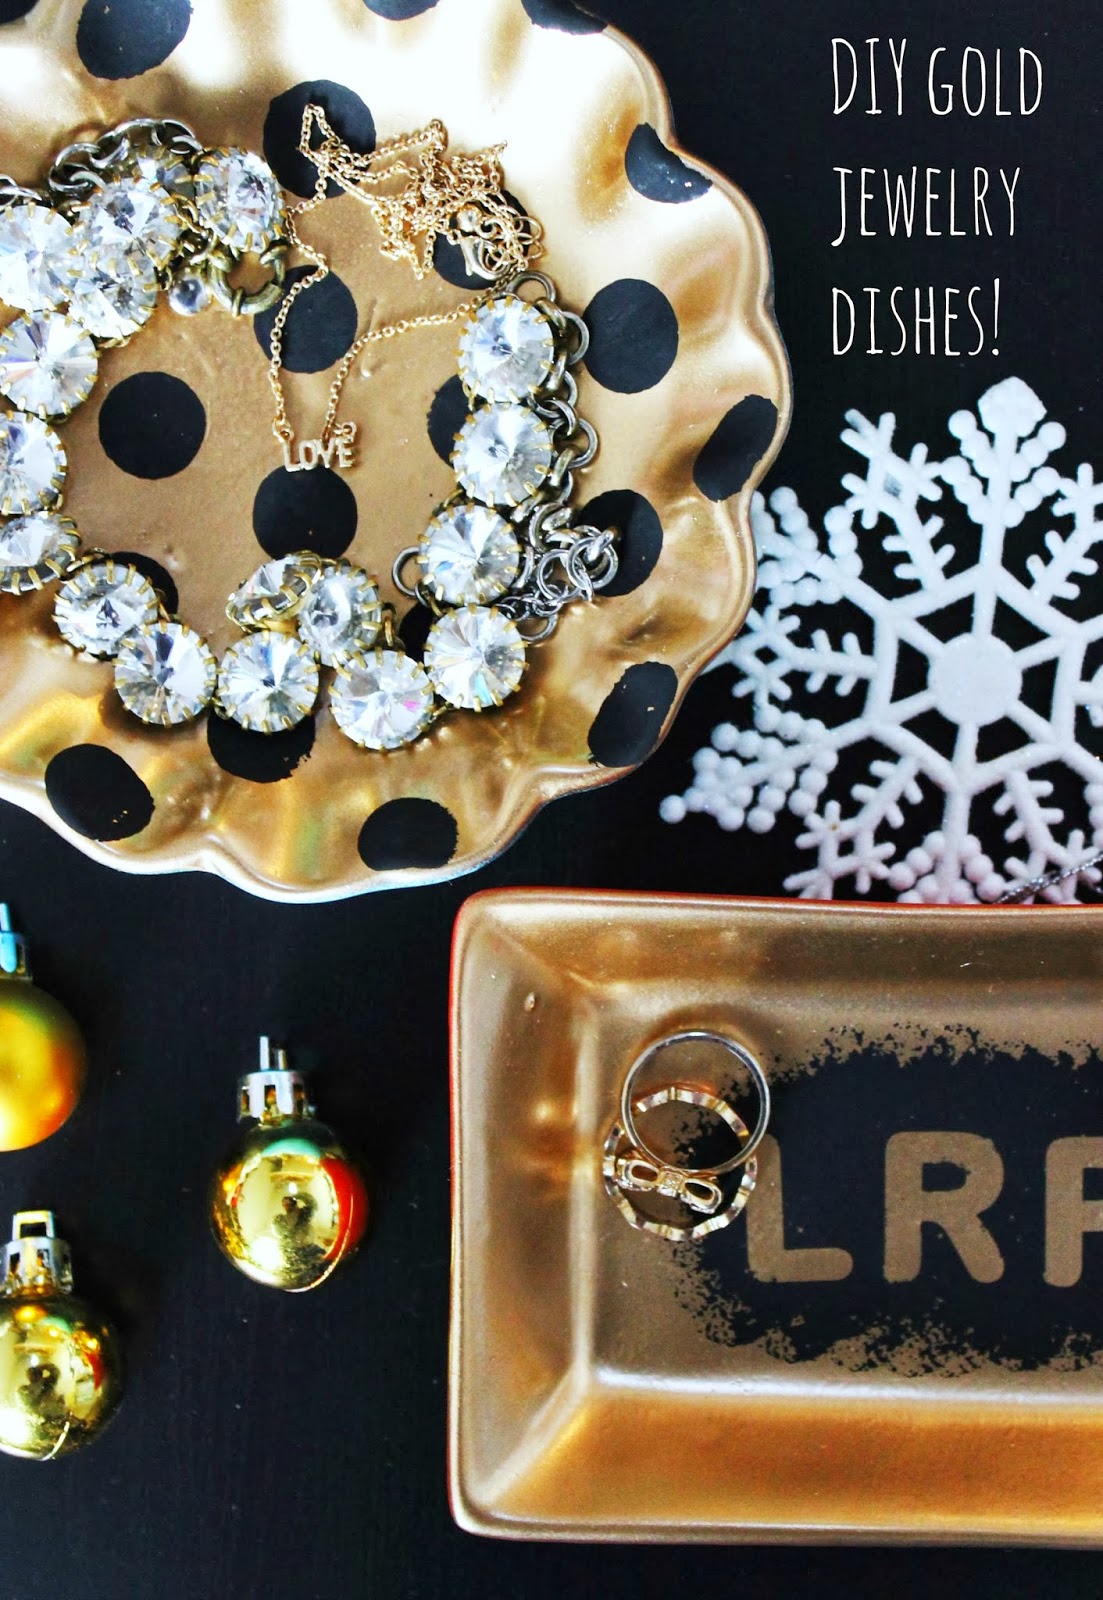
Step 1: Find yourself some cheap ceramic trays! I found mine for $1 in the Target Dollar Spot- but I know Michael's has some options too!

Step 2: Do what's best for them- Spray them gold! It took me 3 light coats of this Krylon to get the look I was going for- but the shine is perfect!

Step 3: Paint it! I used basic black acrylic paint for this- making a polka dotted one, and a monogram one! For the monogram, simple stick on some vinyl or thin stickers, paint over them, wait to dry, and then peel them off! 

Step 4: Seal with Mod Podge, and gift away! 

Clearly you could paint these any colors, and personalize however you know the person would like... oh, and for under $2, you could make one of these for everyone on your list!

What is one of your cheap, go-to holiday gifts?
For more holiday inspiration, go here!

xo, lp

Thursday, November 14, 2013

DIY HOLIDAY: Chalkboard Wine Glasses

This holiday season (yes, I can say that, since Hanukkah is 3 weeks away) is upon us, and this year on the blog I'll be giving some ideas for DIY gifts to give!

The first gift idea is an easy one- Chalkboard Wine Glasses:

Now, truth be told I actually made these a while ago as a housewarming gift for our friends, but they would serve equally well for a holiday gift! They're not only affordable, but they're also a useful gift to give!

What you'll need to make it happen:
- 4 wine glasses (you can get them at a dollar store or Target!)
- Chalkboard Spray Paint 
- Painter's Tape
-Chalk

How to Make it Happen:

Step 1: Make sure your glass bases are fully clean. Any dirt or dust will show up as nasty bumps on your glasses!
Step 2: Tape the entire stem of the glasses, starting about half an inch up from the bottom. 
Step 3: Spray from about 8 inches away the base of your glasses, careful not to get any on the rest of the glass.
Step 4: WAIT FOR IT TO DRY. Don't skip this step!
Step 5: Spray with a second coat, and let dry again.
Step 6: Remove the tape and allow to fully dry overnight
Step 6: Wrap up with a bottle of wine & some chalk, and you've got a great DIY gift!

They're a fun, practical gift to give- that your friends/family can use again and again! 

Have any great DIY gift ideas?
Make sure to share in the comments, I'm always looking for a new project to try!

xo, lp

Tuesday, October 15, 2013

RANCH PUMPKIN SEEDS!

So last year, actually almost exactly 1 year ago to the date, I posted my favorite pumpkin seed recipe
It's my go to, kind of spicy, perfectly salty recipe. 
This year I wanted to try something a little different, so I whipped out my Kernel Season's Ranch. I know you remember them from my Parmesan Garlic Popcorn post, right? Such a groupie, I know.
Anyways, not only is their stuff yummy on popcorn, it is DELICIOUS on pumpkin seeds!

What you'll need:
- 1 1/2 cup Pumpkin Seeds 
- 1 Tablespoon Olive Oil
- Parchment Paper

How to make it happen:
 Step 1: Preheat your oven 350 while you're gutting your pumpkin
Step 2: Clean your seeds off! No one likes pumpkin goop.
Step 3: Toss your seeds in olive oil and spread out your seeds on a parchment paper lined baking sheet.
Step 4: Sprinkle with Ranch seasoning and bake for 10 minutes.
Step 5: Flip your seeds over, and bake for another 15 minutes, until golden brown!
 There is nothing better than pumpkin seeds in the fall. I don't like pumpkin flavored things...except these seeds!


What's one of your favorite fall snacks?
If you like pumpkin seeds, you MUST try this recipe!

xo, lp

Tuesday, October 8, 2013

BOO! CUPCAKES (with a surprise inside!)

 Alright kids. Here it is. My one and only Halloween food post for the year.
What did I go with? BOO cupcakes, clearly! They aren't your usual cupcakes though, they have a super-sweet filling inside, for an extra Halloween treat!

For Valentine's Day Kelly at Studio DIY had the genius idea of using cookie cutters and Airheads to make edible letters on cakes & such. Genius. 
So a few orange Airheads later, I had my BOO cut out:

What you'll need:
- Orange Airheads
- White Frosting (either homemade) or from a container 
- Chocolate cake mix (either homemade) or  from a box
-Orange Food Coloring

How to make it happen:
Step 1: Bake up your cake mix and let cool completely.
Step 2: Cut out the center, fill with orange colored frosting, and top with the cutout.
Step 3: Frost, add your letters, and enjoy!

When I first came up with this recipe I figured it would be great for kids...but I mean, it works for adults too, right?!

What Halloween treats are you making this year?
I can't wait to hear your creative ideas!

xo, lp

Tuesday, February 12, 2013

RASPBERRY CREAM CHEESE POP TARTS

I fully believe when you see great ideas on Pinterest- you should GIVE CREDIT to the websites you originally got said ideas from. There are people behind the pictures, my friends. Give credit where it's due.

Now, that being said, allow me to share the two awesome ladies that inspired these delicious raspberry cream cheese treats! Thus, if my recipe isn't up your alley, check out these talented ladies!
- Jessica @ Novice Chef shared her Nutella Pop Tarts (that gave me the cut out heart idea)
- Sarah @ Cake Student shared her heart Cherry Cheese Pie (that gave me the cream cheese & fruit idea)

With that, here's my creation. Ridiculously easy, ridiculously delicious.
Raspberry Cream Cheese Heart Pie PopTarts!


What you'll need to make it happen:
- Heart cookie cutters
- Premade pie crust
- Cream cheese
-Raspberry preserves (use any kind of fruit!)
- granulated sugar
- egg white
- parchment paper

How to make it happen:
Prep: Preheat your oven to 375 degrees, and set our you cream cheese to soften 15 minutes before starting

Step 1: Using your big heart cookie cutter, cut out as many big hearts as you can, re-rolling the dough as necessary to get as many as you can. Set aside half of them to be your tart toppings.
Step 2: Spread out a thick layer of cream cheese on half of your hearts, and a thick layer of preserves on top of that. Leave a good half inch around the outside so you can press your top layer firmly without any of your filling spilling out!
Step 3: Cut a small heart in the center of the large hearts you set aside, and before placing it on top of your filled heart, lightly spread the dough so it's just a little bit larger than the bottom heart.
Step 4: Cover your filled heart, using your finger or the edge of a cookie cutter to fully press together the edges. 
Step 5: Cover the top with a quick egg wash and a healthy sprinkle of sugar, and let it bake for 16-18 minutes or until golden brown

Eat & Enjoy!

Enough photos for you?
I just am trying to portray how delicious they are! It's for your own good, I promise. These hearts are not only good for a very sweet Valentine's breakfast, but also an easy treat to make for your coworkers.
Thanks to Jessica & Sarah for the inspiration!

Have a Pinterest full of great recipes?
Leave your Pinterest name or link so I can find you!

xo, lp 


Here's a full- Pinterest friendly version for those of you who want to save this recipe for later:

Tuesday, February 5, 2013

CHOCOLATE PEANUT BUTTER OREO POPS

Last week I shared with you some sweet Conversation Heart Cookies...but you didn't think that was the only V-day treat I had up my sleeve, did you? 

This is one that is super easy to make, but looks like you put a lot of time into it. Plus, just change up the color of sprinkles and you're good to go for any holiday!

I present to you:
Chocolate Peanut Butter Oreo Pops

What you'll need to make it happen:
Double Stuff Oreos
Creamy Peanut Butter
Lollipop Sticks (available at Michael's and Target)
Semi-Sweet Chocolate Chips
Shortening (Crisco works well)
Red Candy Melts (available at Michael's and Target)
Sprinkles
Ribbon

How to make it happen:
Step 1: Carefully put your lollipop sticks in your oreo and push them about halfway through without cracking the cookies
Step 2: Apply a thick layer of peanut butter to the tops of the cookies, and stick 'em in the freezer for 15 minutes.
Step 3: Set up a double boiler and melt your chocolate chips and shortening. Pull out your oreos from the freezer and quickly coat them with chocolate. Do this using a spatula quickly- or else the peanut butter will melt all over!
Step 4: Add any sprinkles you want directly on the chocolate right away! Put them back in the freezer for another 15 minutes to harden everything up again.
Step 5: Melt your candy melts in the microwave and drizzle/dip your remaining cookies.
Step 6: After the chocolate is fully hard, tie little bows around the sticks and you're good to go!


Cute, right!?

The best part is you can make them ahead of time and keep them in the freezer so they'll still be great for Valentine's day! 
I really dare you to find someone who doesn't love these. Make them and tell me if you do!

What's your favorite easy-to-make treat?
Share a link from another blog/Pinterest in the comments!

xo,lp

Pssssssssssst: If you'd like to give a whole bunch to one person, try this:
Take a small cardboard box and poke small holes it it using a pen tip. Push your cookie pops into the holes and surround with colorful tissue paper!  You'll have the sweetest bouquet possible! 

Thursday, January 31, 2013

CONVERSATION HEART COOKIES

Two recipe posts in one week!? 
Don't hide your delight, my friends. 

I guess it's not really a true recipe post, since it just is an extension of Tuesday's post about how to ice the perfect sugar cookie
Here's my take on conversation hearts- the candy ones at least. I remember when we were kids those things were delicious. Chalky, not too much flavor, just sugary crunchy heaven. 
Now they have weird sour flavors, new colors, different texture. BLASPHEMY I say. So this year rather than buying those candies, I decided to make my own sugar cookies inspired by them:

Now, for how to ice the perfect cookies, check out my post earlier in the week. Making your own icing is quick, easy, and doesn't require any fancy ingredients or techniques. There isn't a need for special bakery bags or anything, a ziplock will do! 

I colored my icing in a few pastels- use less food coloring than you think you need!

I used gel icing to write out the little messages like "Be Mine" " So Cute" and "xo".
Sidenote: not to sound like an old senile lady complaining more about useless candy- but all the text-speak candy hearts are dumb. There. I said it. Why would I want a heart with "LOL"  or "IDK" on it from someone? Mixed messages I tell ya. 


Of course I wasn't going to make a whole bunch of I LOVE YOU and BE MINE cookies for my co-workers...that might just get awkward. Thus, there are plain iced hearts in abundance for them:

What would your conversation hearts say?
I'm sticking with the simple "xoxo" as my favorite!

xo, lp

Tuesday, January 29, 2013

HOW TO FROST THE PERFECT COOKIE

Before you tell me that frosting a cookie is not rocket science, save your breath.
Duh it's not. Rocket science is rocket science.

However, if you want to get that just brought from the bakery look- read a little further. 

Now, if you use store bought frosting- it'll be thick enough to create a shape, but won't be slick and shiny! Heartbreaking, I know. 

What you'll need to make it happen:
1 cup powdered sugar
1 teaspoon vanilla extract
1 tablespoon butter
2-3 teaspoons milk
Food coloring optional

* the butter is not 100% necessary- but it will make the icing super shiny and lovely. promise.

How to make it happen:


 There you have it. Simple, slick, shiny cookies. 

Do you have a trick to making your cookies look bakery worthy? 
Share away, I'm always looking to improve!

xo, lp


PS: Valentine's cookie post part 2 on Thursday. Stay Tuned.

PPS: Looking to pin the whole tutorial? Got you covered:

Related Posts Plugin for WordPress, Blogger...